Monday, June 4, 2018

Free Contact Management Software for your Business | BitFaster

If you are one of those people who is still using Microsoft Excel to maintain your Customer Contacts, it's time to switch to BitFaster. You no longer have to struggle with CTRL+F to find that Contact you need to quickly call up.

Just download BitFaster Professional from our website www.bitfaster.com and you can get started in less than 5 minutes!

Watch this video below and you can get to understand how BitFaster works.


Wednesday, January 24, 2018

Import Contacts From Excel using BitFaster Alerts

In the article, we will take a look at how we can automate the process of importing Contacts from an Excel file to a BitFaster Group using a BitFaster Alert. It is assumed that you have already updated the Customer ID and Pin in the Options window. If you don't have this information, please contact us to get a trial account.
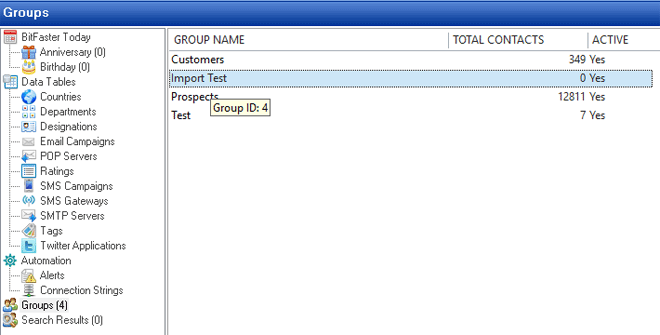
The example will use 7 fields that will be mapped to the Contact_Master table in BitFaster. We will need to make a note of the Group ID to which we will have to import the data (make sure the Groups are created in BitFaster before you start).

View Group ID on Mouse Over
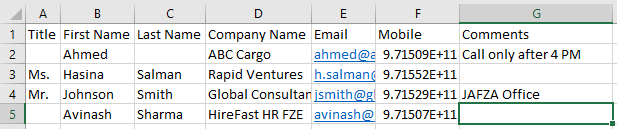
We will import the Contacts to the group named "Import Test" which has an ID 4. The sample data is shown below with the first row as Column Headers:

Sample Excel Data
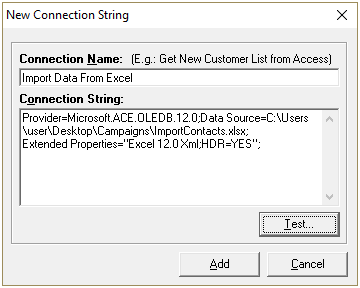
Now that we have our import data ready, let's create a Connection String (from File > New > Connection String) which tells BitFaster details about the Excel file we should connect to (make sure the Excel file is closed before you do this). You will need to change the file name and path after "Data Source" to suit your requirements. Click on the Test button to make sure there are no errors and then Add the Connection String.

New Connection String to Excel file
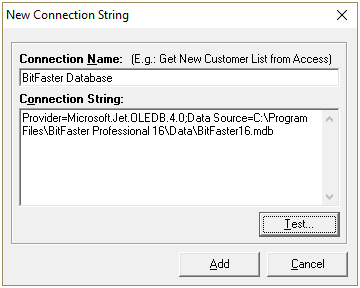
Also make sure you create a Connection String for the BitFaster Database (check for the path in "Data Source" to suit your requirements). Click on the Test button to make sure there are no errors and then Add the Connection String.

New Connection String to BitFaster Database
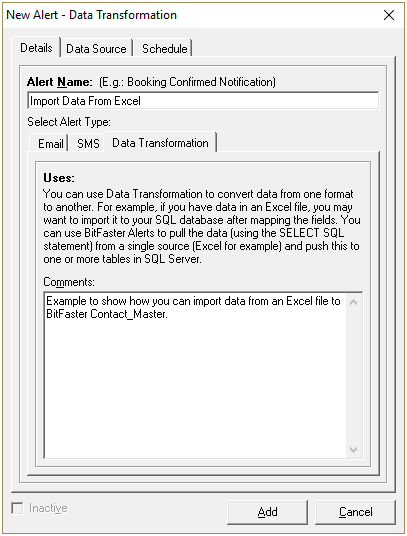
You are now set to create an Alert. From the File menu choose New and then click on Alert. Under the Details tab, choose Data Transformation. Comments are optional.

Create New Alert - Step 1
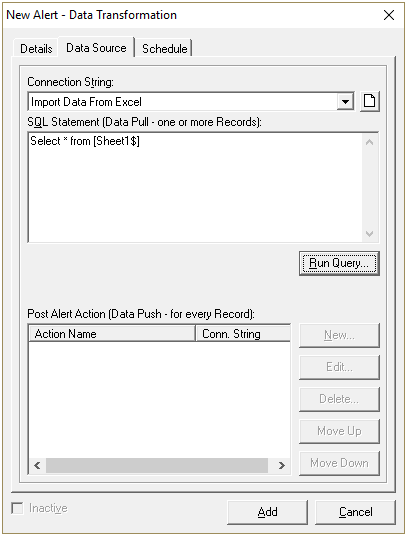
Now click on the Data Source tab, pick the Connection String from the drop down menu and then enter the SQL Statement as shown in the screenshot below. Replace Sheet1$ with the name of the Excel Sheet in case you have renamed it in Excel.

Create New Alert - Step 2
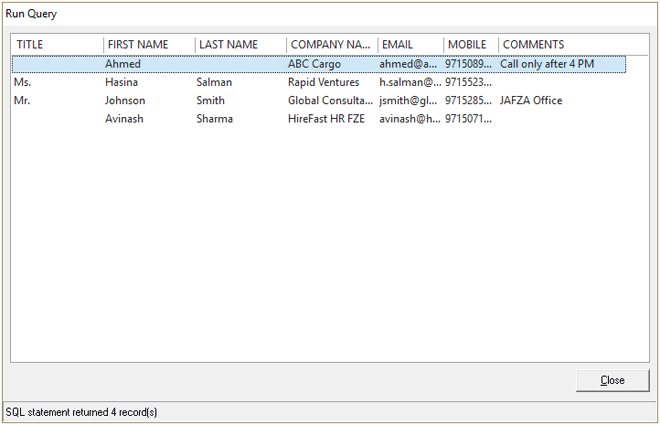
Now you have to click on the Run Query button. You should see all your data from the Excel file as below.

Run Query
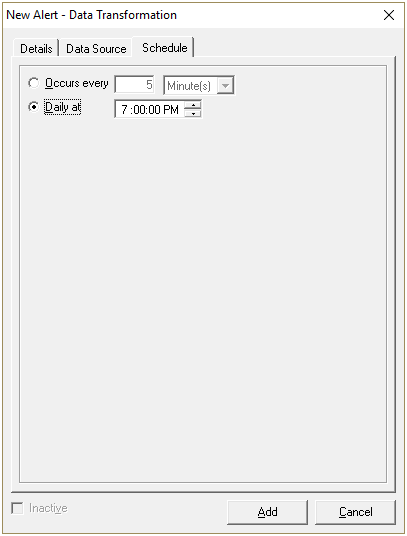
The last step is to specify a Schedule. This tells BitFaster as to when it should execute the Alert. You can run the Alert once a day or at regular intervals (like every 5 minutes) as required.

Create New Alert - Step 3
Now click on the Add button to create the Alert. So far we have seen how we can read the records from Excel. We will now see how we can insert this data into the Contact_Master table in BitFaster.
Now double click on the Alert name (in the BitFaster main window tree view click on Alerts under Automation) to edit it. In the Edit window, choose the Data Source tab and then click on the New button under Post Alert Action.
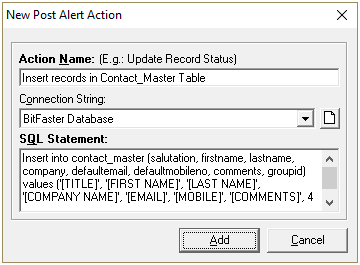
Make sure you choose the Connection String for the BitFaster database from the drop down and enter the SQL statement as shown below. All field values are enclosed in square brackets. Field names should be in all CAPS.
Insert into contact_master (salutation, firstname, lastname, company, defaultemail, defaultmobileno, comments, groupid) values ('[TITLE]', '[FIRST NAME]', '[LAST NAME]', '[COMPANY NAME]', '[EMAIL]', '[MOBILE]', '[COMMENTS]', 4 )

New Post Alert Action
Click on the Add button to create the Post Alert Action. You can have BitFaster execute multiple Post Alert Actions by adding more and then sequencing them as per your requirement. You are now ready to run the Alerts Manager. It is accessible from Tools > Alerts Manager.
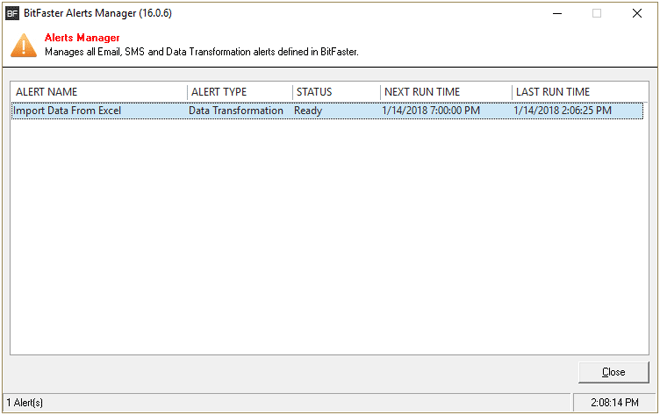
BitFaster runs the Alerts based on your configuration. The Alerts Manager is updated every second to reflect the latest status.

Alerts Manager
Once the Alert is executed, you can check the Contact_Master table in BitFaster to verify if the records have been added as shown below:

Contacts Imported

Tuesday, October 10, 2017

Personalize an Email Campaign

Personalization plays an important role in getting the attention of your users. They should feel that the email is addressed to them and not have generic text such as "Dear Sir/Madam".

To make your communication even more effective, it's best to personalize even the Subject line. For example. the subject line "Thank you for your recent purchase John" has a higher impact when compared to the subject "Thank you for your recent purchase".

BitFaster makes it extremely simple to implement personalization in your campaigns. You can use any of the 66 System Variables to do this in your HTML code. Only a couple of rules you need to remember:
  1. System variables are always enclosed in [...] brackets
  2. System variables are case sensitive and have no space characters
Example:

[FullName]


For a complete list of variables supported, select System Variables from the View menu. You can repeat the variables any number of times in your HTML code.

Monday, February 15, 2016

SMS Response Codes


It is already known to you that running an SMS campaign on BitFaster, requires an SMS Gateway to be configured on it. We have discussed the procedure for doing, so in our previous blogpost on Configuring SMS Gateways on BitFaster. In the same post, we also mentioned that BitFaster supports only HTTP and HTTPS protocols. Generally, every response of a protocol has a certain code associated with it, based on which it is described; the erroneous responses or simply errors are no exception to this.

Errors are of special interest to us in matters like these, as any one of them could kill our primary motive of creating and running a successful SMS campaign. There could be various errors and in the event of a campaign not reaching the targeted person, it is necessary for us to identify the error at the earliest, so as to correct it at the earliest. Any non-technical user of BitFaster, who faces an error should be able to figure out an error and report the same to the appropriate team to initiate the necessary action. The error codes and their brief description can be provided by the gateway service provider. BitFaster can only be configured to report the error issued by the gateway.

In this post, we shall examine the simple procedure to configure BitFaster to alert you on the errors issued by the gateway.

  1. Open BitFaster and click on Tools at the top. Doing so would open up a menu screen as shown below.


  2. Select SMS Response / Error Codes, which opens up a window shown below :


  3. This window shows the list of errors that have already been added in the List of Names field and the error codes corresponding to them in the SMS Response / Error Code field. The above window conveys that when the gateway issues an error with the code 001, BitFaster alerts the user as ‘Authentication Failed’.

    • In order to configure a new error, click on Add in the above window. Doing so would open a new window, as shown below.


    • In the Response Name / Status field, enter the description of the error and the corresponding error code in the SMS Response / Error Code field.

    • Any general comment can be inserted in the Comments field.

    • By checking in the box, Mark Message as Not Sent, the user gets to know of the messages that have been not been sent by the gateway.

    • After completing the above steps, click Add. It updates the list of errors and the codes corresponding to them.

Wednesday, February 10, 2016

Configuring SMS Gateways on BitFaster


In this post, we assume that you have a good insight into the features that our tool – BitFaster has. Therefore, at this juncture, it is perhaps needless for us to mention that apart from email, BitFaster also allows you to run campaigns through SMS. Email campaigns require a local mail server to be configured on BitFaster. Equally well, in order to run campaigns through SMS, it is necessary that BitFaster gets to access an SMS gateway through which it can route all the messages / campaigns.

What is a Gateway?

It is basically a device or a piece of software that routes a message from the base station to the receiver through the telecom networks. In a broad sense, it functions in the same way as the SMTP server. Although it is of different types, a direct-to-SMS gateway is the one we shall concern ourselves with; this is because, a direct-to-SMS gateway allows one to switch between protocols. Although there are different protocols that can be used to govern the process of message transfer; BitFaster supports only http and https protocols. There are several benefits of using https protocol as it is fast, efficient, scalable and secure.

Configuring an SMS Gateway on BitFaster

So now that we’ve realized the role and need of an SMS gateway in our business, let us steer our focus towards configuring one on BitFaster. You will need to follow the steps mentioned below to set up an SMS gateway.

  • First click on SMS Gateways in the tree view, that appears on the left of your BitFaster page. Once you are inside, right click and select New SMS Gateway. Doing so, leads to the window shown below.
  • In the field Gateway Name, enter the name you wish to identify the gateway with.
  • All SMS Gateways require an Application Program Interface (API) to function. This can be obtained from the gateway service providers themselves (usually from their websites).

As an example, let us consider configuring a Clickatell gateway on BitFaster (Please note that you could opt for any gateway service provider and obtain the details accordingly)

  • Open Clickatell website and go to the page that shows the API for HTTP/S protocol.
  • Copy the API in the URL text field. Typically a HTTP API looks something like this :

    https://api.clickatell.com/http/sendmsg?user=xxxxx&password=xxxxx&api_id=xxxxx&to=[MobileNo]&text= [SMS Message]

    The following fields need to be populated appropriately in the API for the gateway to function appropriately:

  • The API username and password as provided by the service provider.
  • API ID is a string that identifies the application to which the gateway has been interfaced. This is generally provided to all registered users.
  • To refers to the mobile number (along with the country code) to which the message is being sent. It is absolutely necessary to use the variable [MobileNo] in the field without which the mobile number of the contact is not sent to the gateway.
  • Text is the message that needs to be sent in the SMS.

Once all these parameters are entered, click Add in the window. This creates a new SMS gateway for BitFaster and you are ready to create and run your SMS campaigns.


Points to Note


  • Only one number can be entered in the To field at a time. This means that BitFaster connects to the gateway as many times as the number of contacts to which the message is sent. Credits maintained by you in the gateway, decrease accordingly.

  • The user need not enter the mobile number of the intended recipient each time; BitFaster automates this process.
  • Sunday, February 7, 2016

    BitFaster and the Social Media


    The phrase “Email Marketing” is perhaps self-explanatory. However, it is not as easy as it sounds, for there are several aspects that need to be taken care of, in order to generate and execute a successful campaign, through mail. While most pioneers in the field of marketing, do acknowledge that email marketing is irreplaceable, it is a fact that they are looking at the social media route as well, to reach out to the customers and quite rightly so. The approaches adopted by the two are different and therefore the results are not surprisingly, different as well. We hope, this quells any doubts about social media having dealt a blow to email marketing. A smart marketing strategy would be to use both, so as to build a more robust customer base.

    When we decide to use what we called a smart marketing strategy, a natural query that arises is regarding the possibility of an interface between the social media application and the email marketing tool. We have addressed this aspect in BitFaster – our successful email marketing tool. BitFaster allows the users to tweet the latest updates on their company profile (on Twitter), through Twitter applications; these applications can be integrated with BitFaster software through a set of codes generated during the creation of the application.

    Those of you who are not very familiar with how to go about this, please read the next section of this blogpost.

    Creating an application and integrating it with BitFaster

    1. Open dev.twitter.com
    2. Scroll down to the bottom and under the ‘Tools’ section, click Manage Your Apps.
    3. Clicking Manage Your Apps leads you to the page shown below, where you click Create New App. If you have apps created for other purposes, they would be present on the left. In our case, we already have BF11Test and BFTester.
    4. Clicking Create New App, opens up a page where one is required to enter the basic details of the intended application.
    • The Name refers to the name of the application and has to be unique.

    • The app can be described briefly in the Description field.

    • The website would be www.bitfaster.com or any other web address with which the application would be interfaced.

    • The callback URL field can be generally left blank.

    After making the relevant entries in these fields, scroll down to accept the developer agreement and click Create my application. This opens up a new page as shown in the next diagram.
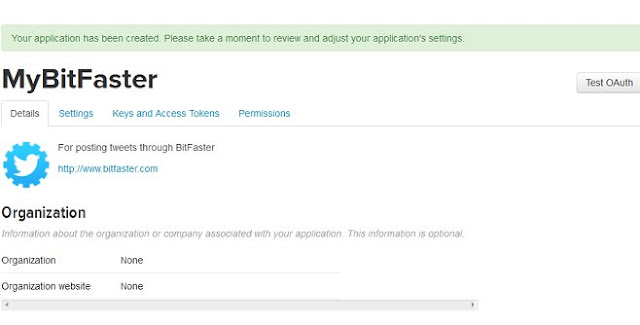

    Now click on Keys and Access Tokens tab and scroll down to the bottom of the page. Click on Create my Access Token. Doing so generates a status update reflected on the top of the page. The status is update is as shown below :
    ----------------------------------------------------------------- Your application access token has been successfully generated. It may take a moment for changes you've made to reflect. Refresh if your changes are not yet indicated. ------------------------------------------------------------------ At this time click on Test OAuth at the right side of the page on the top to see the codes generated as indicated in fig 6. 5. At this time open your BitFaster software and to the left of the page click on Twitter Applications. Right click and select New Twitter Application. Copy all the keys generated on Twitter accordingly. Username could be that of the profile or that of the proposed application.
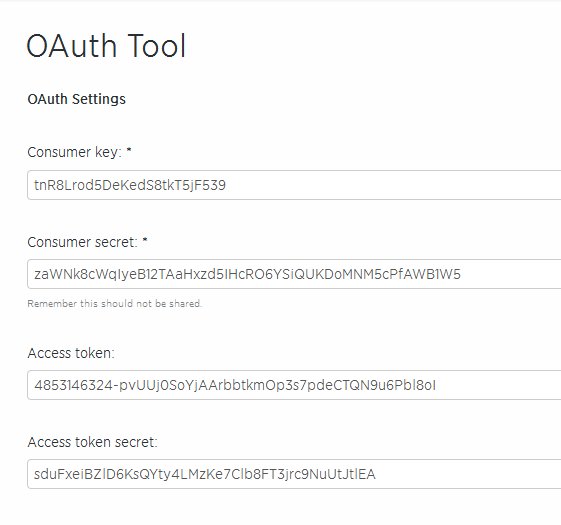
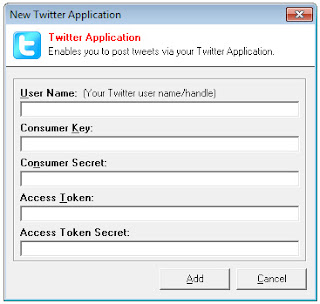
    After populating all the fields, click Add. The new application would appear on the list of other Twitter applications, if any.


    Tweeting through BitFaster

    Well, we’ve seen how to create an application that lets us tweet. But how actually do we use it? It’s fairly simple. Once you know that your Twitter application ready, click on Twitter Applications in the tree view in BitFaster. You can then right click on the right window pane and choose New Twitter Application.

    First we select the application or username that we wish to use and then type the message. Clicking Tweet, ensures that the post appears on the timeline immediately.

    Auto Tweeting

    BitFaster allows us to automate the whole process of tweeting! We can compose a series of tweets and set the exact date and time at which it needs to be posted on the twitter wall. The only 2 conditions are – One, there has to be a minimum time interval of 2 minutes between composing the message and the time set for posting it on the timeline. Two, BitFaster Live has to be kept open.

    On the menu bar at the top, click on the Twitter icon. You will see the window shown below opening. Type the text that you wish to tweet and select Auto Tweet atoption before setting the date and time at which you wish the tweet to appear on your Twitter page.

    BitFaster and Facebook

    As of now, we do not have a mechanism to interface Facebook with BitFaster. However, the updates posted on Twitter can be shared directly on Facebook using the in-built features of Twitter. It is just a matter of time before we update this feature on BitFaster.

    Configuring a local mail server for BitFaster


    In our previous blogposts, help files and other relevant documents, we have spoken sufficiently on the benefits of email marketing; the benefits that BitFaster offers in terms of its user-friendly features, have also been dealt with. In this post, we seek to present briefly, the procedure to configure a local email server on your BitFaster software. This feature is of significant importance as it lets you send mails without a web browser.

    As most of you would be knowing, email works on the Simple Mail Transfer Protocol (SMTP). The sequence of steps would be :

  • 1. A sender generates the content of the mail using a Mail User Agent (MUA).

  • 2. The MUA contacts the local mail server, which in turn contacts the destination mail server using the destination MUA as the basis. If the destination MUA is the same as that of the sender, then the mail transfer is said to be expedited locally.

  • 3. The destination server maintains an inbox to which the mail is transferred after the destination address is verified.

  • 4. The intended recipient gets to access his inbox on the server and is able to view the mail using the POP3 protocol.

  • Gaining access to the local server requires you to create a login account in it. Once you do so, you would be able to route your mails through it. However, the scenario here is slightly different; you already have access to your local server but need to tell BitFaster about it. In other words, you need to provide access to the local mail server of your organization to BitFaster so as to be able to create and run email campaigns or other general mails.

    So how do we configure a local mail server with BitFaster?

  • 1. In the tree view of your BitFaster page (on the left side), click SMTP Servers.

  • 2. The window shown below opens up.

  • 3. Server Name could be the name you wish to give the server. Eg, if you wish to dedicate server for email campaigns, then you could consider calling it Campaign Server.

  • 4. Host Address would be the address of your local mail server. This invariably takes the form smtp.companyname.com. You could always contact the IT department of your organization to get details about your local email server.

  • 5. Username and Password would be the ones provided to the company to the user (who would send out mails).

  • 6. SMTP Port shall always be 25. This is because SMTP Servers use port number 25 on the TCP socket to expedite mail transfer from the client to server.

  • 7. In the event of a client not being able to establish a connection with the server, then the server usually ‘times out’ or stops sending signals. The connection could be kept active for a certain duration entered in the Server Timeout field. This value is usually restricted to 20 or 30 seconds.

  • 8. Confidential information being circulated through mail could be secured through encryption. BitFaster allows the user to choose between SSL and TSL standards of encryption.

  • 9. If required, an active server can be deactivated by clicking the appropriate checkbox. BitFaster even allows the temporary deactivation of the server settings. The settings of one server could also be reproduced in another or even deleted completely.

  • If you’ve done all the above, then you are through!! You could start off with your first email right away!

    Monday, September 2, 2013

    How to get your emails to the Inbox

    You have designed a beautiful email. And you have sent to yourself as a test. Did it land in your Inbox? If it didn’t even after waiting for a reasonable amount of time, chances are your spam filters have it!

    Why does email land in the junk folder? Well, there are several reasons why it could have made its way to the junk folder. Here are some tips (technical ones included!) that you can use to avoid hitting the junk and instead land where you want it to – the Inbox.

    1. From Name and From Address

    Don’t fake it here. Tell the recipient mail server who you really are and what’s your email address. Honesty pays.

    Some technical info which you have to address. If you are not sure what it is, speak to your web host and they should be able to do the needful.

    Check for the PTR/RDNS for your domain (the From Address that you use – e.g. you@yourdomain.com). If this is not configured properly, your mail will go straight to
    junk. No doubt about that!

    2. SMTP server you use

    An SMTP server is used to send out your email campaigns. Again, their setup and configuration is critical for message delivery. Make sure that the IP address you are sending from is not blacklisted. Nor is the domain name. Also, check with your service provider if the server you are using has SPF and DKIM configured. Don’t worry about the technical stuff, but make sure you get a positive confirmation about these from your ESP.

    Most recipient mail servers will reject your email if these things are not configured properly.

    3. Subject text

    This is equally important. If your email is technically through, the anti spam software may still catch you on the subject line.

    Things you can avoid:

    • NEVER SHOUT. Meaning, don’t send your subject with all CAPS
    • Don’t use words like Free, Guaranteed or anything that sounds too good to be true or includes adult stuff
    • Don’t use exclamation marks (!!!)
    • Keep it simple, to the point and less than 50 characters
    • Take care of these 3 things and you are almost there.

    Your next challenge is to get the user to click and open your message. Tell them the truth – what is your email message all about. That’s pretty much everything you need!

    SMTP Server Configuration and Email Throttling

    To send out an email campaign, you need to configure at least one SMTP server in BitFaster. If you  wish to speed up the process of sending an email campaign, you can use more than one SMTP server.

    There is no limit on the number of SMTP servers you can define in BitFaster. BitFaster can automatically distribute the load amongst these servers when you start an email campaign.

    Assuming that you have already defined one or more SMTP servers, follow the steps below to assign the server(s) in the New Email Campaign or Edit Email Campaign window:

    • Select SMTP/Message Settings tab (on the left)
    • Enter the mandatory fields – From Name and From Address
    • In the SMTP Server(s) list box, check/tick one or more SMTP servers
    • Add the Campaign (if you are done with all other settings) or save the changes if you are updating the campaign.

    With this, BitFaster knows the SMTP servers that it has to use for sending out an email campaign. Now, you can tweak some of the settings to optimize delivery.

    Click on the Options icon in the toolbar (or from the menu choose View > Options) to bring up the Options window. Now click on Mail Settings.

    The Maximum Threads field is used to tell BitFaster the number of asynchronous connections it has to initiate with an SMTP Server. For example, if you specify 5 here, BitFaster will initiate 5 simultaneous connection to the SMTP Server and try sending all of them at the same time.

    Please note that the threads you specify is per SMTP Server. If you choose to use 3 SMTP Servers, BitFaster will actually initiate 15 simultaneous connections (5 per server). The more threads you specify and the more SMTP servers you define and use, the faster will the mails get delivered.

    Caution:

    Every email/hosting provider will have the following limitations applied:

    • Maximum threads per SMTP server
    • Maximum number of messages per hour
    • Maximum number of messages per day (24 hour cycle)
    • Make sure you keep this mind (verify them with your service provider) and then select the number of threads. BitFaster can support up to 100 threads per SMTP server.

    The other important setting you can configure in BitFaster is Email Throttling. As mentioned above, your service provider can put an hourly restriction on the number of messages you can send per SMTP server.

    Let’s take an example here so that you can understand how to configure BitFaster better.

    • No. of Emails to be sent: 5000
    • No. of SMTP Servers (or accounts): 3
    • Hourly limit (set by the service provider): 200 messages per SMTP server/account
    • Thread limit (set by the service provider): 10

    Going by the above example, you can send a maximum of 600 messages per hour with 30 threads.

    You can configure BitFaster as per the settings shown below for optimum results:

    • Maximum Threads: 5
    • Enable Auto Pause (Email Throttling): Check/Tick
    • Pause for: 45 minutes
    • After every: 500 messages

    Please Note: Email Throttling is available only in BitFaster Professional.

    The above configuration will tell BitFaster to initiate 15 simultaneous connections, send 500 messages and then wait/sleep for 45 minutes before it can pick up the next set of 500 email addresses. This means, that BitFaster will split your email list into 10 batches of 500 each.

    Assuming that it takes 15 minutes to send out 500 messages, you are now in safe zone because BitFaster will wait for 45 minutes until it picks up the next set of 500 messages. That means you are sending only 500 messages per hour and you will never exceed your quota of 600 messages per hour. Your email campaign will take about 10 hours (or less) to complete the campaign based on all these assumptions.

    Sending an SMS Message to a Contact

    BitFaster can be used to send out SMS campaigns as well. And yes, you can personalize them too!

    Before you can send out an SMS campaign, make sure you have bought SMS credits from a service provider. Any SMS Gateway that supports HTTP/S API will work with BitFaster. Your service provider can give you more information on how to use this API to send out messages.

    You will normally get a URL from your service provider which can be used to send out a message once you input a couple of parameters (as a query string). Check out the example below:

    http://www.smsgateway.com/sendsms?msg=xxx&no=xxx

    Two parameters are mandatory to sending an SMS. You may have other parameters that your service provider might need. Please refer to their guide or tutorial on what all parameters are required.

    In the above example, you will notice that there are two parameters to be sent – msg and no. The first one is for the message you want to send and the second is to the mobile number you wish to send the message to.

    Assuming that we are done with the above two parameters only, you can now add a new SMS Gateway in BitFaster. The steps to do that are:

    • Choose File > New > SMS Gateway from the main menu
    • Enter the Gateway Name (this is for your reference only)
    • Enter the URL text (as shown above or as suggested by your service provider)
    • Make sure that the URL text uses the system variables [MobileNo] and [SMSMessage] when you pass the query string. The URL text could look something like this:

    http://www.smsgateway.com/sendsms?msg=[SMSMessage]&no=[MobileNo]

    Please note that all BitFaster system variables are enclosed in square brackets and are case sensitive.

    Once you have added an SMS Gateway, you can use it to send out an SMS campaign or a single SMS to the selected contact. To send an SMS to a single contact, follow the steps below:

    • Click on a Group name in the tree view under the Main tab
    • Now right click on a Contact Name in the top right window pane and choose Compose SMS

    The mobile number of the contact is automatically shown in the Mobile No. field. Now enter the message you wish to send in the SMS Message text box
    Select the SMS Gateway you want to use and click on Send

    Sunday, September 1, 2013

    Previewing your Campaigns before sending

    Before you send out your email campaign, make sure you preview it in BitFaster. There are two modes that you can use to preview your campaign:

    • Without Personalization
    • With Personalization

    To preview your campaign without personalization (e.g. "Dear Joe"), you can follow the steps below:

    • Choose Email Campaigns (from the tree view in the Main tab)
    • Right click on the campaign you want to preview
    • Click on Preview Campaign

    This option will display your email campaign without personalizing (or mail merging). If you have used any system variables (such as "[FirstNameX]" for personalizing), they will be shown as it is in the preview.

    System variables are used to personalize your campaigns (Email and SMS). A system variable is enclosed in square brackets like [LastName]. Please remember that these are case sensitive.

    Now if you want to view your campaign with personalization, make sure you have added at least one contact in BitFaster. You can then follow the steps below:

    • In the Main tab, expand Groups from the tree view
    • Click on a Group to display all the Contacts under it
    • Right click on a Contact and choose Preview Campaign
    • You can now select an Email or SMS campaign from the list and click on the Preview button

    This will display the campaign in the Campaign Preview tab, but with personalization (mail merge). You can now see that all the system variables you have specified in your campaign text are mail merged and shown.

    Using Gmail as your SMTP Server

    If you are having an email account with Gmail, you can use that as your SMTP Server.

    To configure your Gmail account as an SMTP server, follow the steps below:

    • Select File > New > SMTP Server from the main menu
    • Server Name: Gmail (this can be any name up to 100 characters – for your reference only)
    • Host Address: smtp.gmail.com
    • User Name: youraddress@gmail.com
    • Password: Your Gmail password
    • SMTP Port: 465 (if this does not work, change it to 587)
    • Check the box "This server requires secure connection (SSL)"
    • Click on the Add button